


White Christmas: Rolling out of the paint booth
- Jan 21, 2018
- 4 min read
Twas the night before Christmas, when all thro' the house.... oh, who am I kidding. Here's the long awaited "End year post". Long post alert, as I had to cram in quite a bit from the last time. These are the fruits borne by the tree of procrastination.
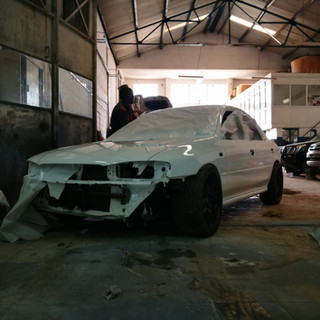
Body. Much processes. So smooth.

Paint booth experience
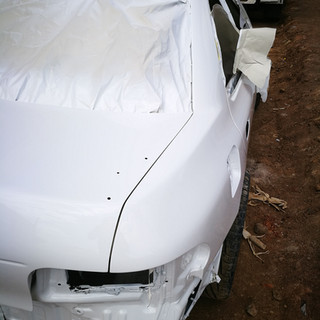
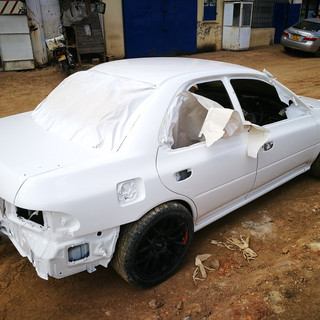
The last time we got a snapshot of the bodywork, it was still looking raw. But once the priming was done, it was followed by a good deal of claywork and fine sanding. Finally the rig was rolled into the paint booth after many months of prep work. Once in the booth, all panels off and a power wash to get any grime and dirt off. Seeing this take shape just gave me a newfound respect for the artisans. A lot of taping up was done to prevent overspray on unwanted areas.A coat of ultimate-white was well done by the Diastar team, in their usual manner.

The first coat went on with all panels off.

Trunk lining and interior was cured of all corrosion and fresh coats done.

Things were starting to look good

Panels were put back on and the wizards went to work.

Another shot of the front end all wrapped up and taped up like a shawarma. Overspray is the enemy, and these guys got that memo.
First reveal: Rolling out of the paint booth
As luck would have it, the paint booth work was completed on a Friday, on schedule for my usual Saturday morning trip to the workshop.

Slow march out.


Watching the car roll out of the paint booth left me feeling a certain type of way. A car guy would understand.

I was just standing there like....
Only missing detail was ability to drive it out on its own power. The lowered stance and overhanging exhaust posed an interesting challenge getting out of the workshop. This would be dealt with soon. With finality.

Crack: New glass required
Somewhere in the process, ye old wind shield gave up. probably from an old fault line agitated by all the flexing during the move from the yard into the paint booth. No problem though as the replacement was already part of the plan. Just realized that I didn't get any pictures of this, so I will update in the next blog.
Rubber bungs
A few sections noted where the rubber bungs need to be refreshed. New drain holes done for the trunk. Additional bungs will be required around the routing of the power lines and the water lines to the IC spray tank in the back. Pics in the next blog as well.
Bumpers: Fresh
Front bumper got a refresh. Smoothed out and prepped for paint. Will be looking to do a subtle lip for that clean and consistent look.

Bumper was looking good, along with the mounting frame that will hold on to the chassis. A few licks of paint and this will be looking brand spanking new.

Rear

The old rear bumper, you ask... let's just say it was in a deplorable state. The kind where replacement seems like a more sensible option than trying to patch it up. So my buddy Hussein over at Version 6 Auto supplied a new piece. Extremely clean, fresh off the boat from Japan. This was a complete setup with the subframe that bolts on to the chassis and black spats on the bottom ends. Since I am going with an all white theme, this will be refreshed in all white and will serve as a good backdrop for a polished stainless steel muffler.

Bumper dry fit: still a few areas to sort out.
Side Skirts:


Side skirts:
Some of the goodies that landed during the festive season included these side skirts. Basic bolt on items with the power to completely change the look of the car. These will be redone in white in keeping with the overall theme.

Dry fitting in progress: things were looking good! coz who doesn't like a well fitted skirt, right?!
Coveted mirrors


After months of trawling the interwebs and many failed bids, I happened to land on these mirrors. They would definitely look the part. So I hit the obligatory "BUY NOW!" option.
Exhaust: Loud or Quiet?

Side shot: elevated

Ground level

Bumper dry fit: the mix and match of new-age(GDB) and old-age(GC) exhaust components caused a bit "extra" to stick out the back. I had detailed this in previous blog posts.
Initial thoughts here were focused on adding a resonator right after the down pipe. This would take care of some of the noise concern.

This invidia resonator was the candidate for silencing duty. However, after lots of measuring and re-measuring and pulling out hair, it seemed that this was not a feasible option. Decided to just shorten the catback by about 3 inches and I shall find a bolt on baffle for those quiet times.


Wheels: In search of fitment


Once again, I detailed in the previous blogs the challenges around the xxr wheels. Wide stance and aggressive offset made them pop out too far and would need significant fender adjustments. I sought out new wheels.
Landed on these OZ superleggeras.

Sadly my supplier forgot their measuring tools at home during purchase confirmation (I think), so I ended up with a set of wheels that neither met my spec nor fit the car/hubs/brakes.
After further searching, I settled for these P1 buddy club racing wheels.


Those looked beautiful on the car. Still would need a hub centric spacer, because that thing about the measuring tool, it happened again. No harm as the clearances were much better here.

Looking dope

Hub centric spacer required. Or a spigot ring to keep the weight off the studs.

Mean muggin' look. Coming soon.
Coming up:
Interior finishing - upholstery and seats, electronics
Exterior finishing - fittings and mouldings, bumpers, buff,
Undercarriage - sealing for some areas. wheelwells paint
Here are a few more bonus shots from the last couple of weeks.


Comments